

Disinfectant Residues: Mitigation and Management
Problems with Residues
Cleanroom residues can be generated by the process, raw materials and people, but a significant contributor to the residues in a cleanroom are the disinfectants themselves. Disinfectants residue is anything left behind by the disinfectant on surfaces, equipment, windows, etc. Residues are inevitable when using a disinfectant.
 Cleaning and disinfection are often used interchangeably when, in fact, they have two different meanings. Cleaning is physically
removing organic matter from the surface. Disinfection is the use of antimicrobial agents to kill microorganisms on a surface. In addition, residue removal is specific to cleaning.
Cleaning and disinfection are often used interchangeably when, in fact, they have two different meanings. Cleaning is physically
removing organic matter from the surface. Disinfection is the use of antimicrobial agents to kill microorganisms on a surface. In addition, residue removal is specific to cleaning.
Most commonly used disinfectants leave significant residues on the surface, which can subsequently have a detrimental effect microbial control in the cleanroom. This is acknowledged in the United States Pharmacopeia (USP) <1072>, the PDA Technical Report No. 70 Fundamentals of Cleaning and Disinfection Programs for Aseptic Manufacturing Facilities, and the EU GMP Annex 1: Manufacture of Sterile Medicinal Products.
In cleanrooms, disinfectant residues are often monitored or measured visually. Disinfectant residues can cause visual, safety and product integrity threats, including sticky or slippery floors and doors, streaks and discoloration, and contamination. If residues are not managed correctly, they can also cause degradation to the facility over time, leading to costly reconstruction or requiring deep cleaning measures.
Application of disinfectants and proper use of tools such as wipes and mops play a critical role in residue management and there are many variables that can pose issues when cleaning and disinfecting, including over-application of disinfectants, frequency of residue removal, reapplication of disinfectant (if longer contact times are required) and the nature of the disinfectant. There is no one-size-fits-all approach for mitigation of residues as part of an overall contamination control strategy.
The appearance of disinfectant residue on different surfaces within the cleanroom can also look less or greater for the same amount of residue, depending on the characteristics of the surface itself. It is common to see disinfectant residues on windows, which can make a facility look dirty and unkept. Highly reflective surfaces such as glass and polished metals will show the residue more significantly, although the amount of residue will be the same.
A disinfectant residue removal step is necessary to mitigate the residue and maintain the cleanliness of the surfaces within the cleanroom. It can include the use of 70% isopropyl alcohol solution or presaturated wipe, water for injection or purified water, 6% Hydrogen Peroxide (6% H202), a detergent or even simply a dry wipe. If using a detergent, it is recommended to rinse with water and follow with a dry wipe (or mop) to remove the solubilized residue since detergents, like disinfectants, contain surfactants that will also leave residues.
While a rinse step is likely not required after every cleaning event, one must be included periodically to prevent the recurrence of residue accumulation on all cleaned surfaces. A reasonable period for residue removal could be every two weeks or once per month, depending on the specific disinfectant chemistries used, the frequency of application and the amount of disinfectant applied to each cleaning. This is also dependent on a risk assessment for the specific cleanroom. It is always recommended to start with longer periods between cleaning and adjusting as needed. Additionally, a detergent may be needed when disinfectant residue is hard to remove or has accumulated on the surface for a long period of time.
Residue on Evaporation
A common method for measuring the potential for residues is called Residue on Evaporation. It involves weighing a solution (100 mL) of the disinfectant, then slowly heating the disinfectant to 104°C for 4-18 hours. After cooling, the sample is weighed again. The difference in weight is expressed as ppm (mg/liter). This method was conducted on several commercial disinfectants by a third-party laboratory (ALS). Below are the results of this study. As can be seen from the results, the level of residue for the different active ingredients can vary significantly from product to product. The table also shows there can be a difference for disinfectants containing the same active ingredient, which would be due to the concentration of the active ingredient in the product, the number of stabilizers required and potentially the addition of preservatives, pH adjusters or odor mitigators.
The visual appearance of a disinfectant residue on a surface may not always correlate with the amount of residue indicated by a residue on an evaporation test. Since all disinfectant residues are different, it is also important to understand how readily the disinfectant residue is removed from equipment, surfaces, floors, walls, ceilings and windows (see Figure 1).
To determine the best course of removal, these simple steps can be taken:
- Evaluate the severity of the residue
- How long it has been on the surface
- The look and feel of surfaces
- Disinfectant characteristics
- Determine the most effective agent to be used for disinfectant removal — common options include:
- Detergent
- water for injection or ultrapure water
- 70% isopropyl alcohol/water blend
- 6% Hydrogen Peroxide
- Dry wipe
- Implement removal aide as part of cleaning and disinfection program
- Determine frequency of removal aide as part of the cleaning and disinfection program
-(1).jpg?sfvrsn=30158626_3)
General Guidelines for Removal of Disinfectant Residues
There are many options for developing a residue removal step as a regular part of a cleaning and disinfection program. In a study conducted in 2023, various approaches were evaluated to determine the most effective approach to removing dried residues of a common disinfectant solution from cleanroom environmental surfaces (ceilings, walls, floors, etc.). The effectiveness of these approaches is shown in Figure 2.
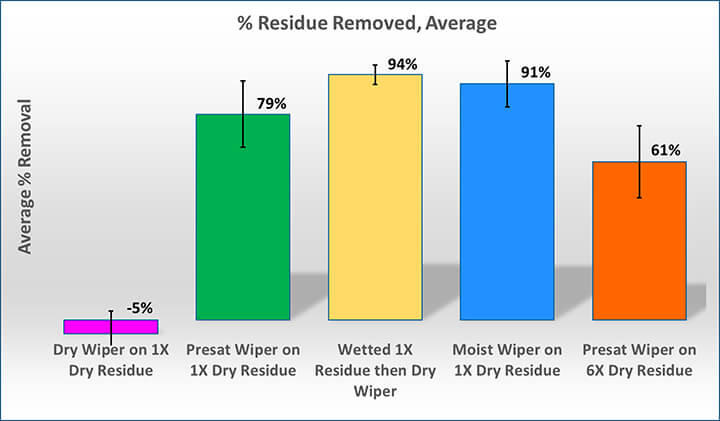
This method to analyze residue removal efficiency was shown to be effective, repeatable and correlates well with observed residue levels. The results indicate that the most effective and efficient removal of dried residue is accomplished by solubilizing the dried residue and removing it with a dry wipe. Similar results may be obtained when removing still-wet disinfectant solution with a dry wipe shortly after application and achievement of required contact time. Lastly, the study showed that residue accumulation greatly exacerbates the difficulty in removing dried residue from surfaces.
The most effective protocol for residue removal depends on several variables, including the surfaces to be cleaned, the amount of residue accumulation on the surfaces, and the elapsed time the residue has remained on the surfaces.
The study results can be divided into strategies for residue removal and management. Below are examples of steps that can be taken to remove residues from the controlled area or cleanroom. These are general recommendations and are to be used as guidance independent of the disinfectant used. Always follow site standard operating procedures.
Residue Removal Steps with Dry Wipe on Wet Surface
- Allow disinfectant to meet validated wet contact time
- Wipe wet disinfectant with dry wipe or mopping tool
- Remove any remaining residue with 70% isopropyl alcohol presaturated wipe
Residue Removal Steps with Presaturated Wipe on Dry Surfaces
- Allow disinfectant to meet validated wet contact time
- Let the surface dry
- Remove disinfectant residue with presaturated 70% IPA wipe (may have to be repeated depending on the severity of the residue)
Residue Removal Step for Floors, Walls and Ceilings for Dry Surfaces with Water for Injection
- Allow disinfectant to meet validated wet contact time
- Let the surface dry
- Apply water for injection to surface using mop or sprayer (if sprayer is used, ensure water does not get onto sensitive or restricted areas)
- Mop or wet/dry vacuum until dry
Residue Removal Step for Floors, Walls and Ceilings for Dry Surfaces with Detergent
- Allow disinfectant to meet validated wet contact time
- Let the surface dry
- Apply detergent to the surface using mop
- Water for injection rinse with mop
- Follow up dry mop or wet/dry vacuum
Conclusion
Disinfectant residues can pose significant cleanliness and operational risks in cleanrooms and other controlled environments, in addition to degrading the appearance of cleanliness. Regulatory organizations worldwide recognize the need to remove or otherwise mitigate disinfectant residues as part of an effective overall contamination control strategy. Effective residue management requires a clear understanding of the type and characteristics of the residues on specific surfaces, the most effective approach to removing the residue and an ongoing program to minimize and control residues from solutions applied to cleanroom environmental surfaces. Study results indicate that the most effective and efficient removal of dried residue is accomplished by solubilizing the dried residue and removing it with a dry wipe. Likely, similar results may be obtained when removing still-wet disinfectant solution with a dry wipe shortly after application and achievement of the required contact time, but residue accumulation greatly exacerbates the difficulty in removing dried residue from surfaces
About the Author
-

Renee Morley, Contec, Inc.
Renee Morley is a Senior Technical Services Specialist for Contec, Inc., providing expertise and evaluation regarding industry best practices and technical applications of disinfectant solutions, wipers, and mops for use in cleanrooms and other controlled environments. Morley has over fourteen years of experience leading training on contamination control in cleanrooms and providing technical support related to critical environments, process research cleaners, and cleaning validation. Morley is a valuable resource in the areas of site evaluations, training, technical presentations and educational seminars.
Morley is the former President of the Parenteral Drug Association’s Southeast Chapter (PDA). Morley joined PDA in 2010 and held various positions with PDASE, starting with the Networking and Events Chair, Secretary, President-Elect, and President. In 2018, Morley was recognized as the PDA Volunteer of the Month, and she also participated on the planning committee for the first virtual PDA Annual Meeting (2020). Morley has received two Service Appreciation Awards honoring her contributions as the President of the PDA Southeast Chapter and for her contributions to the Chapter’s Board of Directors.